hexo | butterfly 主题设置一
唠唠闲话
hexo 官网有很多风格不错的主题,本篇介绍 butterfly 主题的基本配置和美化。
参考文章
官方地址:https://butterfly.js.org/
CSDN:hexo 博客 butterfly 主题美化
Github:Butterfly 项目地址
限于篇幅,本篇只介绍基础样式,特殊效果和功能另外再介绍。
内容一览

安装主题
-
搭建博客框架,参看hexo | 博客框架搭建。
-
进入博客目录,下载 butterfly 主题,官方提供了两种方法
方法一,用 git 将主题下载到 themes 目录1
git clone https://github.com/jerryc127/hexo-theme-butterfly.git themes/butterfly
方法二(同步不方便,不推荐),用 npm 将主题下载到 node_modules 目录
1
npm i hexo-theme-butterfly
-
进入主题目录,复制配置文件 _config.yml 到博客主目录,并改名为 _config.butterfly.yml
1
2
# 方法1
cp themes/butterfly/_config.yml ./_config.butterfly.yml -
修改 _config.yml ,将其中 theme 参数改为 butterfly
1
theme: butterfly
-
安装渲染工具
1
npm install hexo-renderer-pug hexo-renderer-stylus
此时,用 hexo s 启动,就进入了 butterfly 主题。
注:命令 npm i 中,i 为 install 的缩写,但也有差异,参见npm i和npm install的区别。npm i 默认为局部安装,安装目录为 node_modules。
文章内部
文章封面
在文章开头的 title 下添加一行
1 | cover: <图片链接> |
注:图片可放在 source 目录,用链接引用,使用方便但加载慢,更推荐的方法是图床。
代码高亮
在 _config.butterfly.yml 中找到下边代码并修改。
1 | highlight_theme: light # darker / pale night / light / ocean / mac / mac light / false |
参数说明:
- highlight_theme # 设置代码样式,个人偏好为 mac
- code_word_wrap # 设置是否换行
- 其他参数参看注释
赞赏界面
-
在 _config.butterfly.yml 中找到下边代码,将
enable参数改为 true1
2
3
4
5
6
7
8
9
10# Sponsor/reward
reward:
enable: false
QR_code:
# - img: /img/wechat.jpg
# link:
# text: wechat
# - img: /img/alipay.jpg
# link:
# text: alipay -
将对应二维码截图放在
themes/butterfly/source/img目录下
底部分享按钮
在 _config.butterfly.yml 中找到下边代码并修改。
1 | # Share.js |
注:国内分享一般去掉前两个。
版权声明
文章的版权声明,追加在末尾。
在 _config.butterfly.yml 中检索 copyright,将 enable 设置为 true,编码 decode 设置为 utf-8
1 | post_copyright: |
注:不需要加 Copyright 的文章只需要在开头(front-matter)加一行参数
copyright: false
文章预览
显示封面图
在 _config.butterfly.yml 中找到下边代码并修改。
1 | cover: |
参数说明:
- 前三个参数设置不同位置是否放图片预览
- index_enable 设置主页面
- aside_enable 设置侧边栏
- archives_enable 设置归档页面
- position 设置主页面预览图位置
预览文字
在 _config.butterfly.yml 中找到下边代码。
1 | # Display the article introduction on homepage |
参数说明:
- method 参数取 1 或 2 或 3,代表不同预览方式,建议修改为 2。
- 参数取 3 :摘取正文前边的文字
- 参数取 1 :取 markdown 头部 description 参数的内容。
- 参数取 2 :当 markdown 头部没有 description 参数时摘取正文,否则按 description 参数的内容。
个人信息

头像
在 _config.butterfly.yml 中找到下边代码,将 img 参数改为头像图片的地址.
1 | # Avatar |
姓名
这部分在 _config.yml 中直接修改,注意不是修改 _config.butterfly.yml 。
社交图标
默认使用语法 fa xxx 引用网站 FontAwesome里的图标。
使用阿里 iconfont
参考文章
CSDN:Hexo博客之优雅使用阿里 iconfont 图标
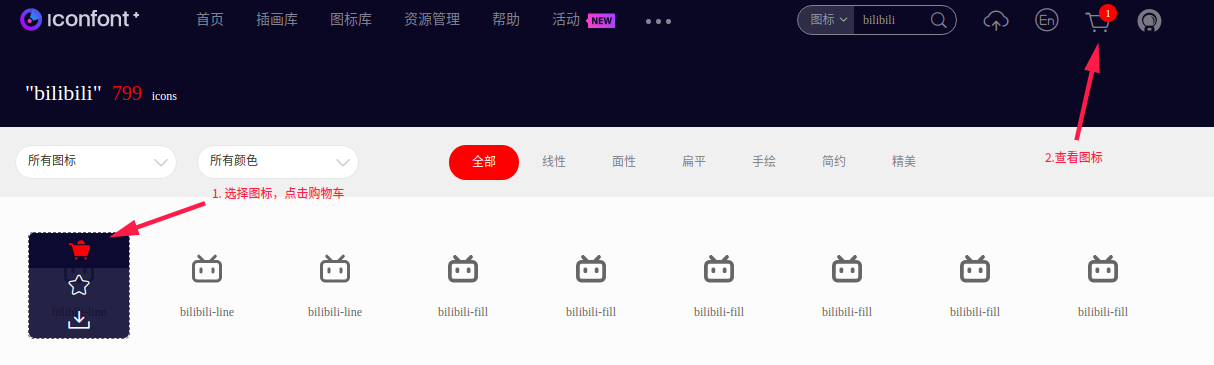
一些图标 [FontAwesome] 上没有,比如 bilibili 小电视,这时可以用阿里的 iconfont 图标,使用教程如下
-
进入阿里 iconfont 寻找想要添加的图标,点击右上角购物车
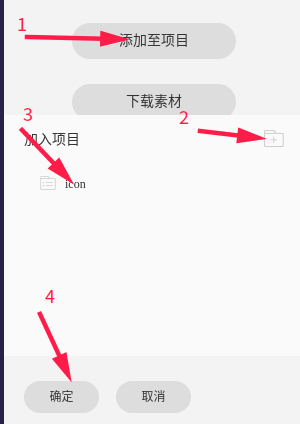
-
依次点击新建项目 -> 添加项目 -> 确定
-
依次点击资源管理 -> 我的项目 -> 查看在线链接 -> 点击 css 文件
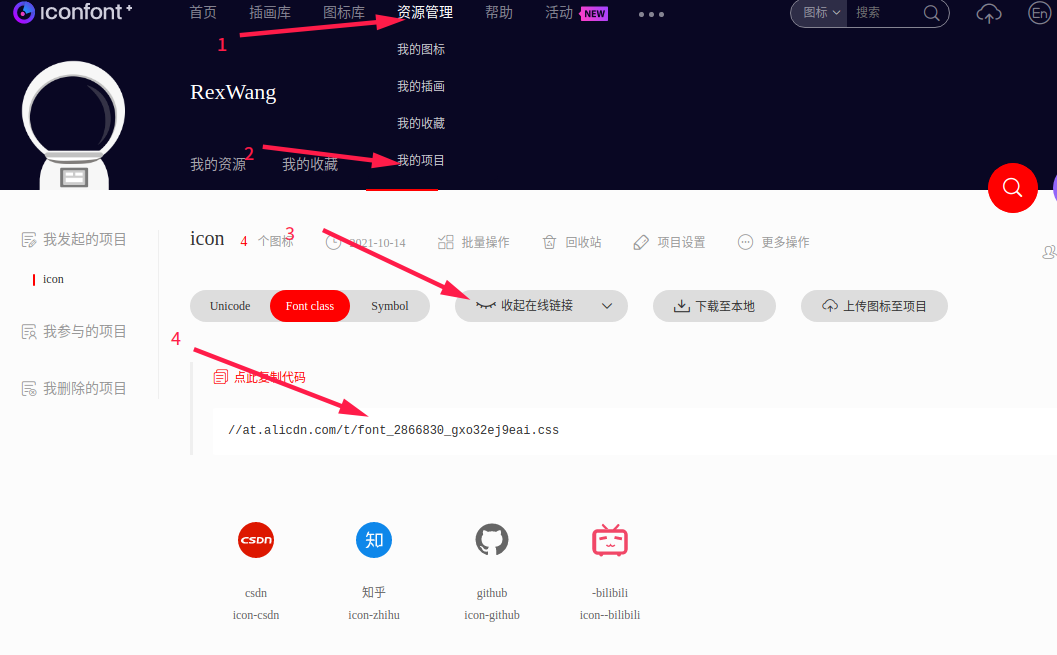
-
将文件保存到博客目录,例如放在
themes/butterfly/source/css/iconfont.css -
引用 css 文件:在 head 标签中添加一行
<link rel="stylesheet" href="/css/iconfont.css">
对 butterfly 主题,编辑themes/layout/includes/head.pug,找到下边字段并修改(添加最后一行)1
2
3
4//- main css
link(rel='stylesheet', href=url_for(theme.CDN.main_css))
link(rel='stylesheet', href=url_for(theme.CDN.fontawesome) media="print" onload="this.media='all'")
link(rel="stylesheet" href="/css/iconfont.css")
设置图标
在 _config.butterfly.yml 中找到 social settings 并修改,例如
1 | # social settings |
设置说明:
- 冒号 : 前为图标设置,参看。
- || 后为图标的文字描述,即鼠标移动到图标时会显示的文字。
<link>和<text>根据自己内容修改
follow me
关注这行在后边 侧边栏 中设定
菜单栏设置
标签设置
参考博客
-
新建标签文件
1
hexo new page "tags"
-
进入 source/tags,修改 index.md(添加了 type 一行)
1
2
3
4
5---
title: tags
date: 2021-07-18 16:48:20
type: "tags"
--- -
在文件 _config.butterfly.yml 中,找到 menu 选项添加一行
1
2menu:
Tags: /tags/ || fas fa-tags -
文章标签设置
- 单个标签
1
tags: 标签
- 多个标签
1
2
3tags:
- 标签1
- 标签2
- 单个标签
注1: hexo n “博客名” 创建博客;hexo new page “名称” 则是创建“关于我”的页面。
注2:第三步中,|| 后设置图标
注3:文章设置标签时,用 tag 和 tags 效果等价。
分类设置
与标签方法相同,其中 category 和 categories 效果等同。
搜索功能
- 安装插件
1
npm install hexo-generator-search --save
- 在 _config.butterfly.yml 找到 local_search 并修改(将 enable 参数改为 true)
1
2
3
4
5
6# Local search
local_search:
enable: true
labels:
input_placeholder: Search for Posts
hits_empty: "We didn't find any results for the search: ${query}" # if there are no result
注:labels 一行可以不写。
其他
编写模板
进入博客主目录,修改 scaffolds/ 目录下的 post.md 文件。每次使用 hexo n 新建文章时,都会按 post.md 的内容,生成空白模板。
参考内容(比初始模板加了后四个参数):
1 | --- |
404页面
默认设置如下,将 false 改 true。
1 | # A simple 404 page |
侧边栏
找到下边模块,并修改
1 | # aside (側邊欄) |
注:_config.butterfly.yml 中还有很多设置,例如访问验证 site_verification,数据分析 Analysis,广告 Advertisement;此外还有主题配色 theme_color,背景动态等等效果设置。本篇只介绍博客最基本的部分。
踩坑的地方
**主题配置文件 _config.butterfly.yml 中,参数填写错误导致样式失效。**例如下边 author 参数只接收 true 和 false ,但填写人名就会导致代码高亮等样式失效。
1 | # anchor |
到这里,一个简约漂亮的博客就搭建好了。用 Github 部署的网站为静态网站,方便管理维护,但功能也有限。下边视频介绍了用 bmob 来实现动态网站功能,视频地址:github page + bmob 搭建动态网站。
 wechat
 alipay